
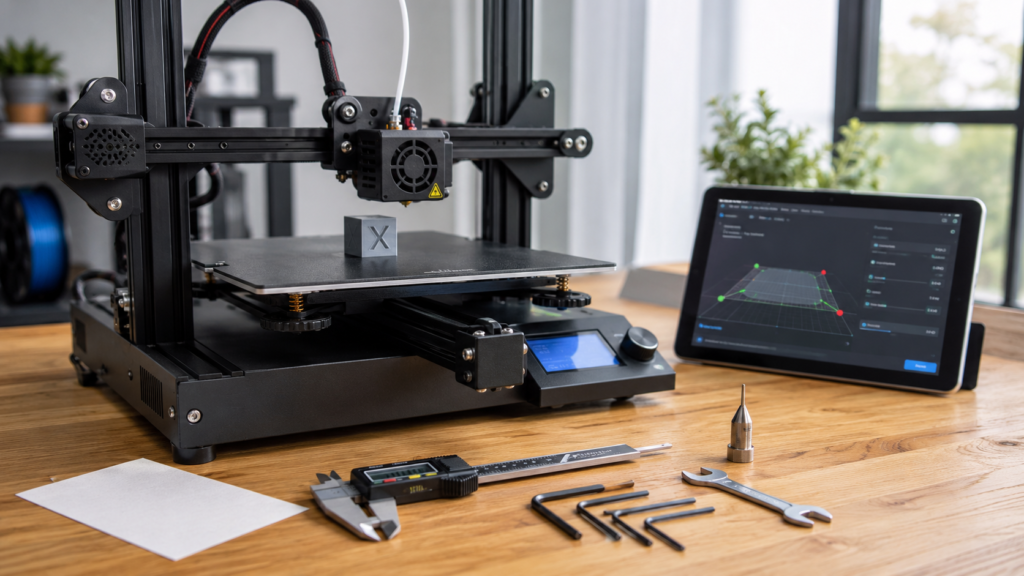
- Cómo Calibrar una Impresora 3D
- ¿Por qué es importante calibrar una impresora 3D?
- Herramientas necesarias para calibrar una impresora 3D
- Nivelación de la cama: el ajuste más importante de una impresora 3D
- Cómo ajustar correctamente el Z Offset
- Cómo conseguir una primera capa perfecta
- Calibración del extrusor (E-Steps)
- Calibración del flujo (Flow Rate)
- ¿Qué ocurre si el flujo es incorrecto?
- Cómo calibrar el Flow Rate
- Cubos de calibración: una herramienta imprescindible
- Cómo interpretar un cubo de calibración
- Cómo medir correctamente el filamento
- Cómo detectar problemas de sobreextrusión
- Cómo detectar problemas de subextrusión
- Resultado esperado tras la calibración del extrusor
- Calibración de la retracción
- Calibración de temperatura
- Calibración de velocidad de impresión
- Pruebas de calibración avanzadas
- Cómo saber si tu impresora 3D está bien calibrada
- Conclusión
- Preguntas frecuentes sobre calibración de impresoras 3D
Cómo Calibrar una Impresora 3D
Una de las principales razones por las que muchas impresiones 3D fallan no tiene nada que ver con la calidad de la impresora ni con el material utilizado.
En la mayoría de los casos, el verdadero problema es una mala calibración.
De hecho, incluso una impresora 3D económica puede producir resultados sorprendentes si está correctamente ajustada, mientras que una máquina mucho más avanzada puede ofrecer impresiones mediocres cuando la calibración no es la adecuada.
Por este motivo, aprender cómo calibrar una impresora 3D es una de las habilidades más importantes que cualquier usuario debería dominar.
Una impresora correctamente calibrada permite:
- Mejorar la calidad de impresión.
- Reducir errores.
- Disminuir el desperdicio de material.
- Obtener medidas más precisas.
- Mejorar la adhesión de la primera capa.
- Conseguir acabados más profesionales.
Además, muchos problemas habituales como:
- Warping.
- Falta de adhesión.
- Stringing.
- Sobreextrusión.
- Subextrusión.
pueden solucionarse simplemente realizando una calibración adecuada.
En esta guía aprenderás paso a paso cómo ajustar correctamente tu impresora para obtener los mejores resultados posibles.
| Ajuste de calibración | Dificultad | Impacto en la calidad |
|---|---|---|
| Nivelación de cama | Fácil | ⭐⭐⭐⭐⭐ |
| Z Offset | Fácil | ⭐⭐⭐⭐⭐ |
| Calibración E-Steps | Media | ⭐⭐⭐⭐ |
| Flow Rate | Media | ⭐⭐⭐⭐ |
| Retracción | Media | ⭐⭐⭐⭐ |
| Temperatura | Fácil | ⭐⭐⭐ |
| Velocidad | Fácil | ⭐⭐⭐ |
| Aceleración y Jerk | Avanzada | ⭐⭐⭐ |
| Input Shaping | Avanzada | ⭐⭐⭐⭐ |
Consejo rápido: Si eres principiante, céntrate primero en la nivelación de la cama, el Z Offset y la calibración del extrusor. Son los ajustes que más mejoran la calidad de impresión.
¿Por qué es importante calibrar una impresora 3D?
La impresión 3D es un proceso donde intervienen numerosos factores.
Pequeñas variaciones en cualquiera de ellos pueden afectar significativamente al resultado final.
Por ejemplo:
- Una cama mal nivelada puede arruinar la primera capa.
- Un extrusor mal calibrado puede provocar exceso o falta de material.
- Una temperatura incorrecta puede generar defectos superficiales.
- Una retracción mal configurada puede producir hilos entre piezas.
Cuando todos estos parámetros trabajan correctamente, la calidad mejora de forma espectacular.
Por ello la calibración no debe verse como una tarea puntual, sino como parte habitual del mantenimiento de cualquier impresora 3D.
Herramientas necesarias para calibrar una impresora 3D
Antes de comenzar conviene disponer de algunas herramientas básicas.
Herramientas recomendadas
- Hoja de papel estándar.
- Calibrador digital.
- Regla metálica.
- Filamento de buena calidad.
- Modelos de prueba de calibración.
- Software slicer actualizado.
No es imprescindible disponer de equipamiento profesional.
De hecho, la mayoría de calibraciones pueden realizarse utilizando herramientas muy sencillas.
La mejor estrategia consiste en seguir siempre el mismo orden.
Esto evita que una calibración afecte negativamente a otra.
El primer paso y el más importante es la nivelación correcta de la cama de impresión.
Nivelación de la cama: el ajuste más importante de una impresora 3D
Si tuviéramos que elegir una única calibración capaz de marcar la diferencia entre una impresión exitosa y un fracaso absoluto, sería la nivelación de la cama de impresión.
De hecho, gran parte de los problemas que experimentan los usuarios principiantes tienen su origen precisamente aquí.
Cuando la cama no está correctamente nivelada pueden aparecer problemas como:
- Mala adhesión.
- Warping.
- Primera capa irregular.
- Piezas deformadas.
- Impresiones que se despegan.
- Acumulación excesiva de material.
Por eso, antes de tocar cualquier otro parámetro, debemos asegurarnos de que la base sobre la que se construirá la pieza está perfectamente ajustada.
¿Qué significa nivelar una impresora 3D?
Nivelar una impresora 3D consiste en ajustar la distancia entre la boquilla (nozzle) y la superficie de impresión.
El objetivo es conseguir que esa distancia sea uniforme en toda la cama.
Aunque muchas impresoras modernas incorporan sistemas de Auto Bed Leveling (ABL), sigue siendo importante entender este proceso.
La nivelación automática ayuda enormemente, pero no sustituye completamente una buena calibración inicial.
Cómo saber si la cama está mal nivelada
Existen varios síntomas muy fáciles de identificar.
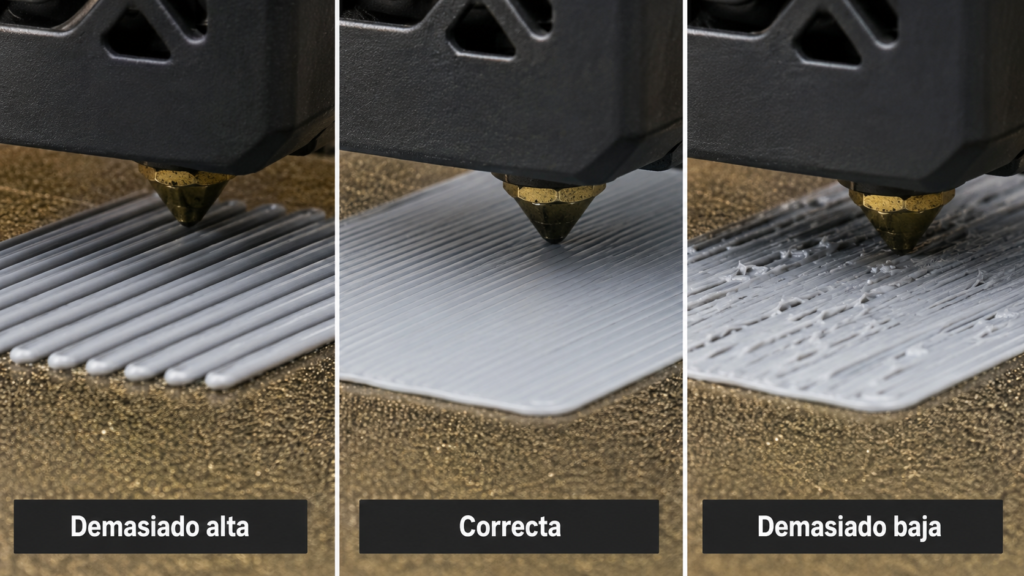
Boquilla demasiado alta
Cuando la boquilla está demasiado lejos de la superficie:
- El filamento no se aplasta correctamente.
- Las líneas aparecen separadas.
- La pieza puede despegarse fácilmente.
Visualmente suele verse algo parecido a «espaguetis» depositados sobre la cama.
Boquilla demasiado baja
Cuando la boquilla está excesivamente cerca:
- El filamento se aplasta demasiado.
- Aparecen marcas.
- El extrusor puede atascarse.
- La primera capa se vuelve irregular.
En casos extremos incluso puede dañar la superficie de impresión.
Nivelación desigual
Si algunas zonas imprimen correctamente y otras no:
- Es probable que la cama no esté nivelada.
- Puede existir una ligera deformación.
- El sistema de compensación no está funcionando correctamente.
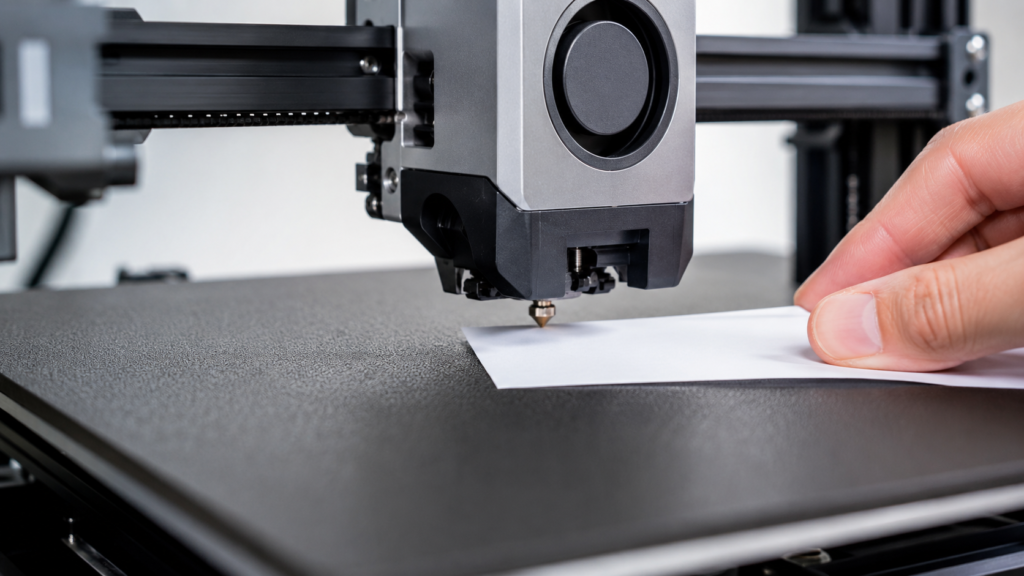
Método clásico: nivelar la cama con una hoja de papel
Aunque existen métodos más avanzados, esta sigue siendo la técnica más utilizada.
Además funciona perfectamente.
Paso 1
Calienta la impresora.
Es importante realizar la nivelación con la temperatura habitual de trabajo.
Por ejemplo:
PLA:
- Hotend: 200°C
- Cama: 60°C
PETG:
- Hotend: 240°C
- Cama: 80°C
ABS:
- Hotend: 250°C
- Cama: 100°C
Las dilataciones térmicas pueden modificar ligeramente las medidas.
Paso 2
Haz Home de todos los ejes.
La impresora debe conocer su posición exacta antes de comenzar.
Paso 3
Desactiva los motores.
Normalmente encontraremos una opción llamada:
- Disable Steppers.
- Disable Motors.
Paso 4
Coloca una hoja de papel entre la boquilla y la cama.
El objetivo es notar una ligera resistencia al mover el papel.
No debe quedar:
❌ Suelto.
❌ Bloqueado.
Debe deslizar con una resistencia suave.
Paso 5
Ajusta las ruedas de nivelación.
Realiza el proceso en:
- Esquina frontal izquierda.
- Esquina frontal derecha.
- Esquina trasera izquierda.
- Esquina trasera derecha.
Después vuelve a repetir el ciclo.
Normalmente necesitaremos varias pasadas.
Paso 6
Comprueba el centro de la cama.
Una vez ajustadas las esquinas verifica también la zona central.
Nivelación automática (Auto Bed Leveling)
Las impresoras modernas incorporan sensores como:
- BLTouch.
- CR Touch.
- Inductivos.
- Capacitivos.
Estos dispositivos miden múltiples puntos de la superficie.
Posteriormente el firmware compensa automáticamente pequeñas irregularidades.
Actualmente encontramos sistemas ABL en impresoras como:
- Bambu Lab A1.
- Bambu Lab P1S.
- Bambu Lab X1 Carbon.
- Creality K1.
- Elegoo Neptune 4.
- Anycubic Kobra.
Aun así, conviene revisar periódicamente el estado general de la cama.
Cómo ajustar correctamente el Z Offset
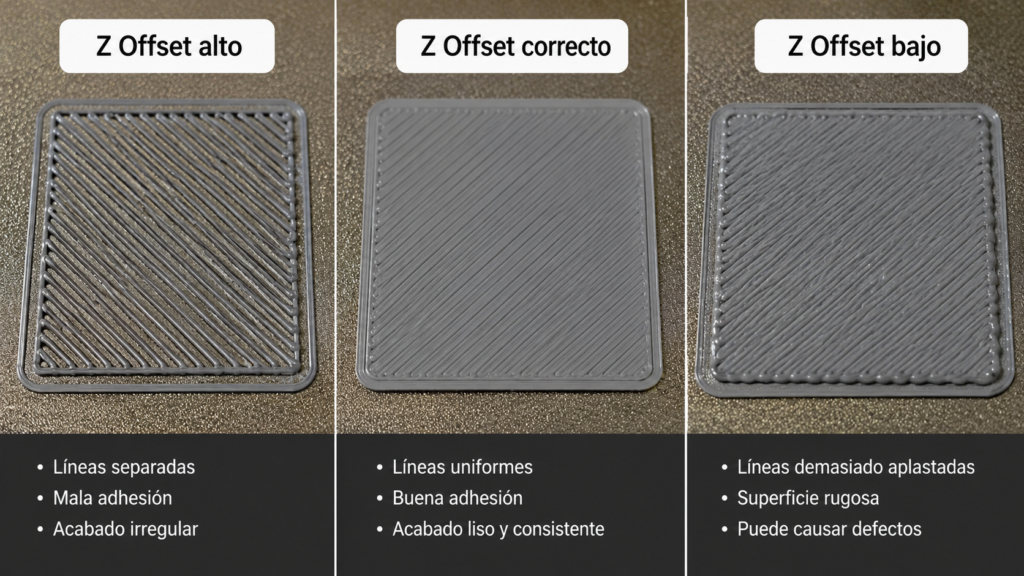
Una vez nivelada la cama llega uno de los parámetros más importantes:
El Z Offset.
El Z Offset define la distancia exacta entre la boquilla y la superficie de impresión cuando la impresora considera que está en Z=0.
Pequeñas diferencias de apenas décimas de milímetro pueden afectar enormemente a la calidad de la primera capa.
Síntomas de un Z Offset demasiado alto
- Mala adhesión.
- Líneas separadas.
- Primera capa débil.
- Piezas que se despegan.
Síntomas de un Z Offset demasiado bajo
- Exceso de aplastamiento.
- Marcas en la superficie.
- Acumulación de material.
- Riesgo de dañar la cama.
Cómo encontrar el Z Offset perfecto
La mejor técnica consiste en imprimir una prueba de primera capa.
Mientras la impresora trabaja, ajustamos progresivamente el offset hasta conseguir:
✅ Líneas uniformes.
✅ Buena unión entre pasadas.
✅ Superficie lisa.
✅ Adhesión correcta.
Este pequeño ajuste suele producir mejoras espectaculares.
Cómo conseguir una primera capa perfecta
Dentro del mundo de la impresión 3D existe una frase muy conocida:
Una buena impresión comienza con una buena primera capa.
Y es totalmente cierta.
La primera capa actúa como los cimientos de una casa.
Si falla, todo lo que venga después estará comprometido.
Factores que afectan a la primera capa
Nivelación
El factor más importante.
Z Offset
Directamente relacionado con la adhesión.
Temperatura de cama
Cada material necesita temperaturas diferentes.
Limpieza de la superficie
Una cama sucia puede arruinar cualquier impresión.
Recomendamos limpiar regularmente con:
- Alcohol isopropílico.
- Productos específicos recomendados por el fabricante.
Velocidad de primera capa
Las primeras capas suelen imprimirse más despacio.
Esto mejora notablemente la adhesión.
Test de primera capa
Una de las mejores herramientas de calibración consiste en imprimir patrones específicos de primera capa.
Estos modelos permiten observar rápidamente:
- Z Offset.
- Adhesión.
- Uniformidad.
- Nivelación.
Además consumen muy poco material.
Por ello recomendamos utilizarlos después de cualquier ajuste importante.
Resultado esperado
Cuando la cama está correctamente nivelada y el Z Offset es el adecuado deberíamos obtener:
✅ Primera capa uniforme.
✅ Adhesión consistente.
✅ Sin huecos entre líneas.
✅ Sin exceso de aplastamiento.
✅ Base sólida para toda la impresión.
Y una vez conseguido esto podremos pasar a la siguiente fase de calibración: el ajuste del extrusor y la cantidad exacta de material que la impresora deposita en cada capa.
Calibración del extrusor (E-Steps)
Una vez que la cama está perfectamente nivelada y hemos conseguido una primera capa uniforme, llega el momento de calibrar uno de los componentes más importantes de cualquier impresora 3D:
El extrusor.
La función del extrusor es empujar exactamente la cantidad de filamento que la impresora necesita en cada momento.
Si la cantidad extruida no es correcta, aparecerán problemas que afectarán directamente a la calidad de impresión.
Por este motivo la calibración de los E-Steps es una de las tareas más importantes para conseguir piezas precisas.
¿Qué son los E-Steps?
Los E-Steps (Extruder Steps per Millimeter) indican cuántos pasos debe realizar el motor del extrusor para empujar un milímetro de filamento.
Cada impresora incorpora un valor predeterminado de fábrica.
Sin embargo, pequeñas variaciones mecánicas pueden provocar diferencias entre la cantidad teórica y la cantidad real de material extruido.
Por ello conviene comprobar periódicamente este ajuste.
Problemas de una mala calibración del extrusor
Sobreextrusión
La impresora expulsa más material del necesario.
Síntomas:
- Superficies irregulares.
- Acumulación de material.
- Capas excesivamente gruesas.
- Detalles poco definidos.
Subextrusión
La impresora expulsa menos material del necesario.
Síntomas:
- Huecos entre capas.
- Paredes débiles.
- Falta de consistencia.
- Piezas frágiles.
Cómo calibrar los E-Steps paso a paso
Este método funciona en prácticamente cualquier impresora FDM.
Paso 1
Calienta el hotend a la temperatura habitual del filamento.
Por ejemplo:
PLA:
- 200°C
PETG:
- 240°C
ABS:
- 250°C
Paso 2
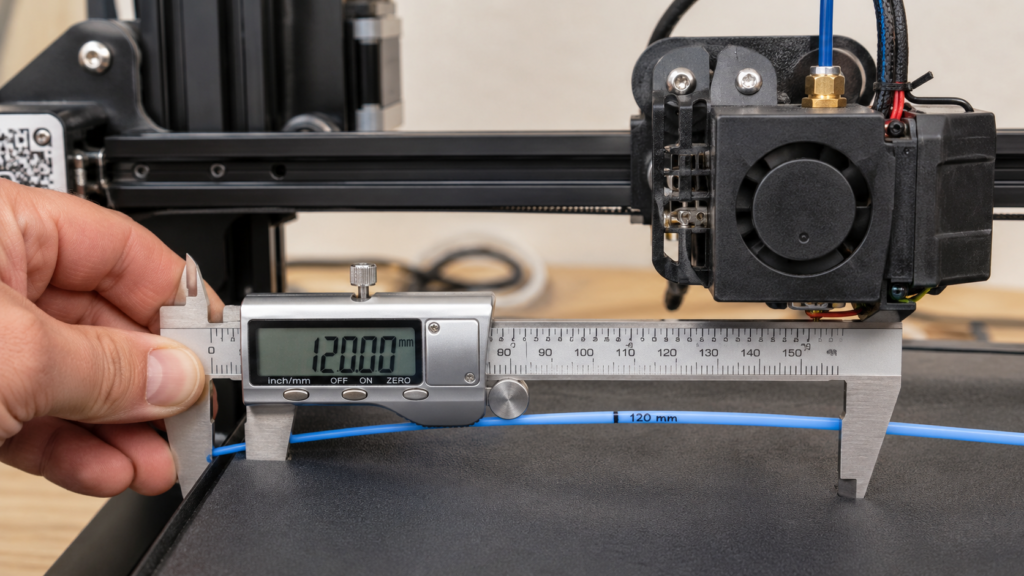
Marca exactamente 120 mm de filamento utilizando un calibre o una regla precisa.
La marca debe realizarse desde el punto de entrada del extrusor.
Paso 3
Ordena a la impresora extruir 100 mm de filamento.
Paso 4
Mide cuánto filamento queda hasta la marca.
Ejemplo:
Si después de extruir quedan 25 mm en lugar de 20 mm significa que realmente sólo ha extruido 95 mm.
Paso 5
Calcula los nuevos E-Steps.
La mayoría de firmwares permiten introducir fácilmente el nuevo valor.
Una vez actualizado, repite la prueba hasta obtener una extrusión prácticamente perfecta.
Calibración del flujo (Flow Rate)
Una vez ajustados los E-Steps llega el siguiente nivel de precisión:
La calibración del flujo de material.
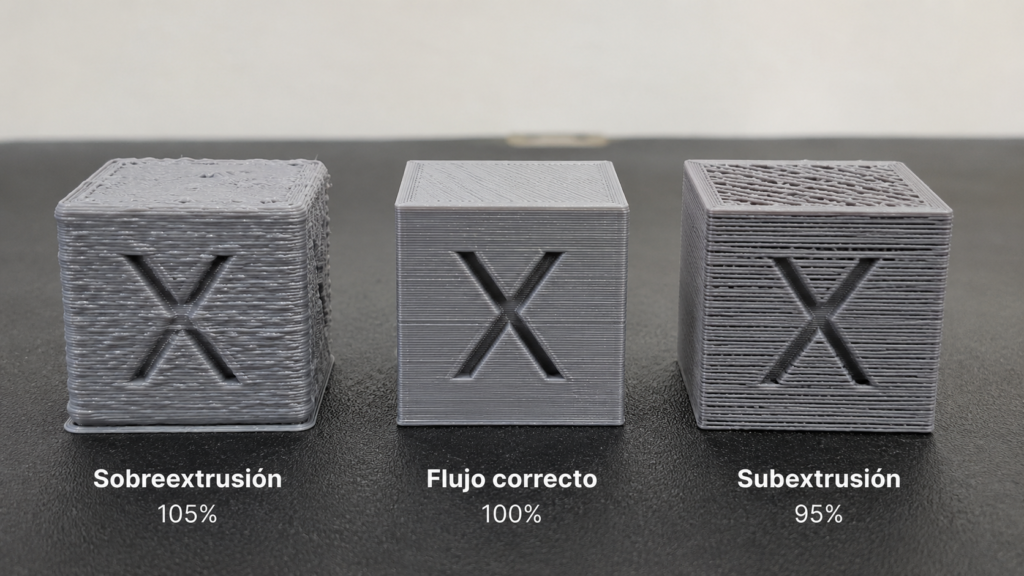
Mientras que los E-Steps corrigen el comportamiento mecánico del extrusor, el flujo permite afinar la cantidad real de plástico depositada durante la impresión.
Esta calibración es especialmente importante cuando utilizamos:
- Nuevos materiales.
- Distintos fabricantes de filamento.
- Boquillas diferentes.
- Alturas de capa específicas.
¿Qué ocurre si el flujo es incorrecto?
Flujo demasiado alto
Aparecen:
- Exceso de material.
- Capas abultadas.
- Superficies rugosas.
- Detalles poco definidos.
Flujo demasiado bajo
Aparecen:
- Huecos visibles.
- Falta de unión entre capas.
- Debilidad estructural.
Cómo calibrar el Flow Rate
Actualmente la mayoría de usuarios utilizan pruebas específicas incluidas en programas como:
- OrcaSlicer.
- Bambu Studio.
- PrusaSlicer.
Estas herramientas generan piezas diseñadas para identificar rápidamente el flujo óptimo.
El procedimiento suele consistir en:
- Imprimir varias muestras.
- Comparar resultados.
- Seleccionar la mejor superficie.
- Aplicar el ajuste recomendado.
Cubos de calibración: una herramienta imprescindible
Uno de los modelos más utilizados para comprobar la precisión de una impresora 3D es el famoso:
Cubo de calibración 20x20x20 mm.
Su simplicidad lo convierte en una herramienta extremadamente útil.
Permite verificar:
- Dimensiones.
- Precisión.
- Flujo.
- E-Steps.
- Calidad superficial.
Cómo interpretar un cubo de calibración
Una vez impreso debemos medirlo utilizando un calibre digital.
Dimensiones esperadas:
- X = 20 mm
- Y = 20 mm
- Z = 20 mm
Si las medidas difieren significativamente puede ser necesario revisar:
- E-Steps.
- Flujo.
- Tensiones mecánicas.
- Correas.
Cómo medir correctamente el filamento
Un aspecto que muchos usuarios pasan por alto es que el diámetro del filamento puede variar ligeramente.
Aunque se comercializa como:
- 1.75 mm
- 2.85 mm
en realidad pueden existir pequeñas diferencias.
Por ello es recomendable medir varios puntos de la bobina utilizando un calibre digital.
Posteriormente podremos introducir ese valor en el slicer para mejorar la precisión de impresión.
Cómo detectar problemas de sobreextrusión
La sobreextrusión suele ser relativamente fácil de identificar.
Síntomas más habituales:
- Exceso de material visible.
- Esquinas redondeadas.
- Letras poco definidas.
- Superficies rugosas.
En estos casos suele ser necesario:
✅ Revisar flujo.
✅ Revisar E-Steps.
✅ Verificar diámetro del filamento.
Cómo detectar problemas de subextrusión
La subextrusión es igualmente frecuente.
Síntomas:
- Huecos entre líneas.
- Capas débiles.
- Paredes incompletas.
- Superficies con zonas faltantes.
Las causas más habituales suelen ser:
- E-Steps incorrectos.
- Flujo insuficiente.
- Boquilla parcialmente obstruida.
- Filamento de baja calidad.
Resultado esperado tras la calibración del extrusor
Cuando E-Steps y flujo están correctamente ajustados obtenemos:
✅ Dimensiones más precisas.
✅ Mejor calidad superficial.
✅ Paredes uniformes.
✅ Menor consumo innecesario de material.
✅ Impresiones más fiables.
Una vez completada esta fase podremos pasar al siguiente nivel de optimización: la calibración de retracción, temperatura y velocidad, tres parámetros que influyen enormemente en el acabado final de las piezas.
Calibración de la retracción
Una vez que la impresora extruye la cantidad correcta de material, el siguiente paso consiste en optimizar la retracción.
La retracción es uno de los parámetros que más influyen en el acabado visual de una pieza.
Su función es muy sencilla:
Cuando la boquilla se desplaza de un punto a otro sin imprimir, el extrusor retrae ligeramente el filamento para evitar que siga saliendo material.
Si este ajuste no es correcto aparecerán defectos muy comunes.
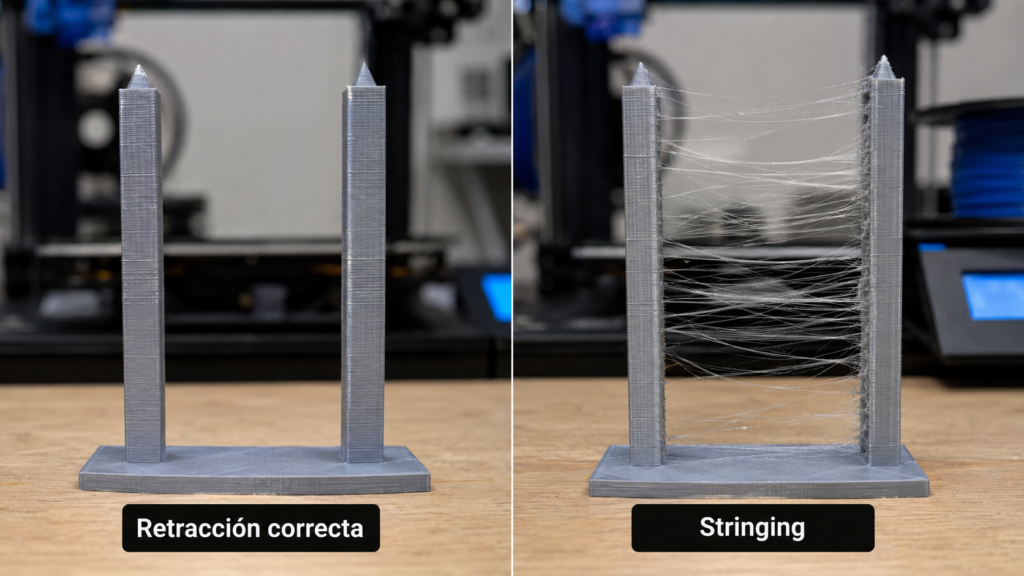
¿Qué es el stringing?
El stringing es uno de los problemas más habituales en impresión 3D.
Se reconoce fácilmente porque aparecen pequeños hilos de plástico entre distintas partes de la pieza.
Visualmente parecen telarañas.
Las causas más frecuentes son:
- Retracción insuficiente.
- Temperatura demasiado alta.
- Filamento húmedo.
- Velocidad incorrecta.
Cómo calibrar la retracción
La forma más sencilla consiste en utilizar una prueba específica de retracción.
Estas pruebas suelen mostrar:
- Dos torres separadas.
- Varias columnas.
- Geometrías diseñadas para forzar desplazamientos.
A medida que modificamos los parámetros observamos la cantidad de hilos generados.
Distancia de retracción orientativa
Extrusor Direct Drive
- 0.5 mm a 2 mm
Sistema Bowden
- 3 mm a 7 mm
Estos valores son únicamente una referencia inicial.
Cada impresora puede requerir ajustes diferentes.
Velocidad de retracción
La velocidad también resulta fundamental.
Valores habituales:
- 25 mm/s
- 35 mm/s
- 45 mm/s
- 60 mm/s
La mejor configuración dependerá de:
- Tipo de extrusor.
- Material.
- Hotend.
- Velocidad general de impresión.
Calibración de temperatura
Otro parámetro que influye enormemente en la calidad de impresión es la temperatura.
Aunque los fabricantes indican rangos recomendados, cada impresora y cada bobina pueden comportarse de forma diferente.
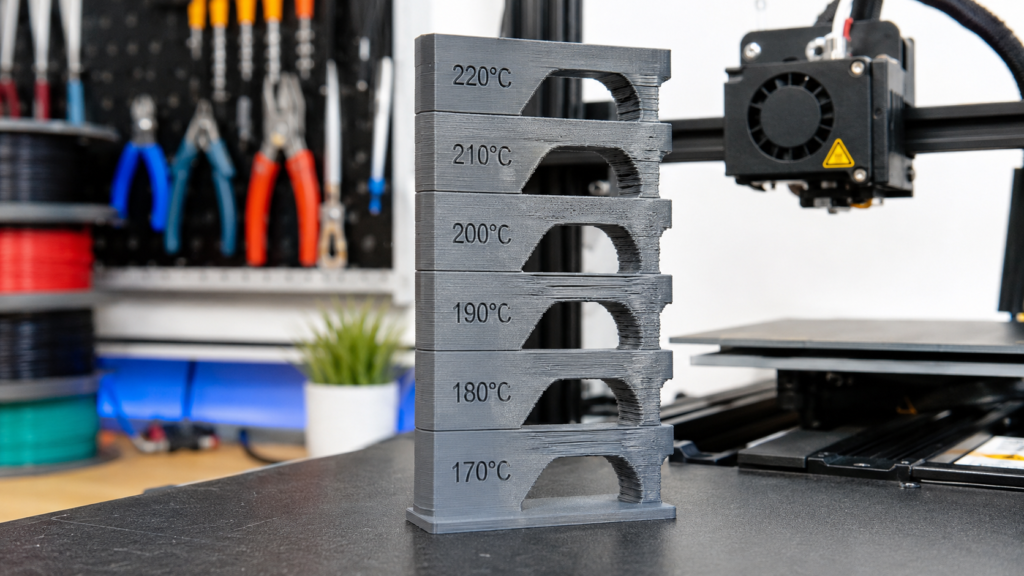
Por este motivo los usuarios avanzados suelen realizar pruebas específicas conocidas como:
Temperature Towers
o
Torres de temperatura
¿Qué es una Temperature Tower?
Se trata de un modelo dividido en múltiples secciones.
Cada zona se imprime a una temperatura distinta.
Por ejemplo:
- 220°C
- 215°C
- 210°C
- 205°C
- 200°C
- 195°C
Una vez finalizada la impresión analizamos cuál ofrece:
- Mejor acabado.
- Menos stringing.
- Mayor definición.
- Mejor adhesión entre capas.
Temperaturas habituales según material
PLA
- 190°C – 220°C
PETG
- 220°C – 250°C
ABS
- 230°C – 260°C
TPU
- 210°C – 240°C
Estas cifras son orientativas.
La temperatura ideal siempre dependerá del fabricante y de las características concretas del material.
Calibración de velocidad de impresión
La velocidad es uno de los parámetros más importantes y, al mismo tiempo, uno de los más mal entendidos.
Muchos usuarios intentan imprimir lo más rápido posible.
Sin embargo, aumentar excesivamente la velocidad puede provocar:
- Pérdida de detalle.
- Vibraciones.
- Ghosting.
- Mala adhesión entre capas.
- Defectos superficiales.
¿Cuál es la velocidad ideal?
No existe una respuesta universal.
Dependerá de:
- La impresora.
- El material.
- El hotend.
- El sistema de movimiento.
Como referencia general:
PLA
- 50 mm/s – 150 mm/s
PETG
- 40 mm/s – 100 mm/s
ABS
- 40 mm/s – 80 mm/s
Las impresoras modernas de alta velocidad pueden superar ampliamente estas cifras.
Ghosting y Ringing
Uno de los problemas que suele aparecer cuando aumentamos demasiado la velocidad es el llamado:
Ghosting
o
Ringing
¿Qué es el Ghosting?
Consiste en pequeñas ondulaciones visibles cerca de esquinas, textos o detalles.
Normalmente aparecen debido a:
- Vibraciones.
- Aceleraciones excesivas.
- Correas mal tensadas.
Cómo reducir el Ghosting
Reducir velocidad
Es la solución más sencilla.
Ajustar aceleraciones
Muchas impresoras permiten modificar:
- Acceleration.
- Jerk.
- Input Shaping.
Revisar estructura mecánica
Comprobar:
- Correas.
- Poleas.
- Tornillería.
- Guías.
Pruebas de calibración avanzadas
Una vez dominados los ajustes básicos, existen pruebas adicionales que permiten optimizar todavía más la calidad de impresión.
Cubo XYZ
Permite comprobar:
- Dimensiones.
- Precisión.
- Escalado.
Torre de temperatura
Optimiza la temperatura del material.
Torre de retracción
Reduce stringing.
Prueba de flujo
Ajusta el Flow Rate.
Prueba de puentes (Bridging)
Permite evaluar la capacidad de imprimir voladizos sin soporte.
Prueba de voladizos (Overhang Test)
Muy útil para optimizar refrigeración y calidad superficial.
Orden recomendado de calibración
Uno de los errores más frecuentes consiste en modificar múltiples parámetros al mismo tiempo.
La mejor estrategia es seguir siempre el mismo orden:
1. Nivelación de cama
2. Z Offset
3. E-Steps
4. Flow Rate
5. Temperatura
6. Retracción
7. Velocidad
8. Pruebas avanzadas
Seguir este proceso evita que una modificación afecte negativamente a otra.
Resultado esperado tras una calibración completa
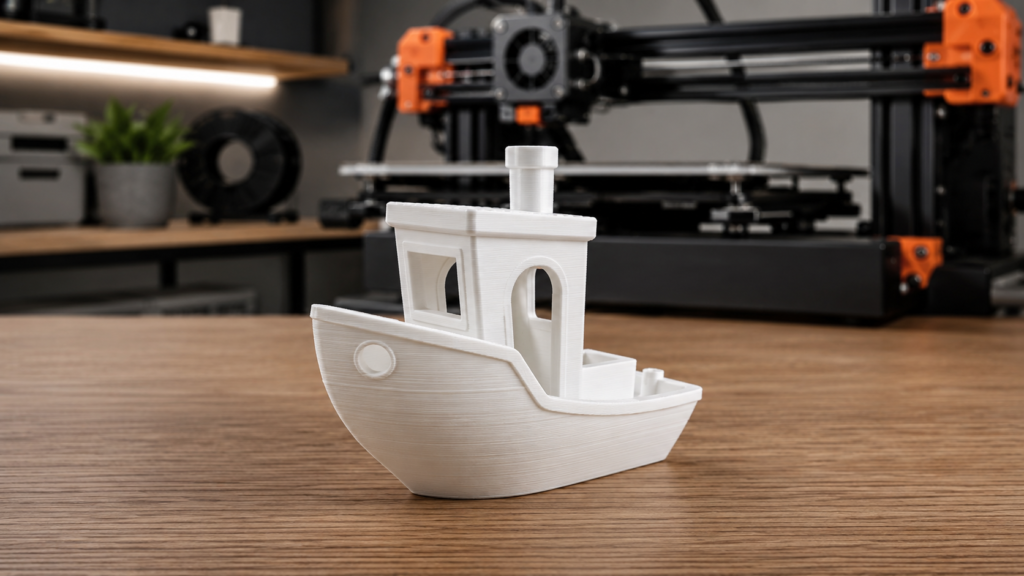
Cuando todos estos parámetros están correctamente ajustados, la mejora suele ser espectacular.
Obtendremos:
✅ Mejor calidad superficial.
✅ Menos stringing.
✅ Mayor precisión dimensional.
✅ Mejor adhesión entre capas.
✅ Menos errores de impresión.
✅ Menor desperdicio de material.
✅ Piezas más resistentes.
Y lo más importante:
✅ Impresiones mucho más fiables y repetibles.
Una impresora correctamente calibrada puede ofrecer resultados profesionales incluso sin necesidad de realizar grandes inversiones en hardware.
Cómo saber si tu impresora 3D está bien calibrada
Después de realizar todos los ajustes anteriores surge una pregunta lógica:
¿Cómo saber si la impresora está realmente bien calibrada?
La respuesta es bastante sencilla.
Una impresora correctamente calibrada debe producir piezas que presenten las siguientes características:
✅ Primera capa uniforme.
✅ Buen acabado superficial.
✅ Ausencia de stringing.
✅ Dimensiones precisas.
✅ Paredes consistentes.
✅ Buena adhesión entre capas.
✅ Sin deformaciones inesperadas.
Además, las impresiones deben repetirse con resultados similares una y otra vez.
La consistencia es uno de los mejores indicadores de una buena calibración.
Señales de que todavía existe algún problema
Si observas alguno de estos síntomas probablemente sea necesario revisar algún ajuste:
Problemas de adhesión
Posibles causas:
- Cama mal nivelada.
- Z Offset incorrecto.
- Temperatura insuficiente.
Hilos entre piezas
Posibles causas:
- Retracción incorrecta.
- Temperatura excesiva.
- Filamento húmedo.
Dimensiones incorrectas
Posibles causas:
- E-Steps mal calibrados.
- Flujo incorrecto.
- Problemas mecánicos.
Vibraciones visibles
Posibles causas:
- Velocidad excesiva.
- Correas flojas.
- Aceleraciones demasiado altas.
Errores más comunes al calibrar una impresora 3D
La calibración puede parecer complicada al principio.
Sin embargo, la mayoría de problemas suelen producirse por una serie de errores muy concretos.
Modificar demasiados parámetros a la vez
Este es probablemente el error más habitual.
Si cambias:
- Temperatura.
- Retracción.
- Flujo.
- Velocidad.
simultáneamente, será imposible saber qué ajuste ha generado la mejora o el problema.
La mejor estrategia consiste en modificar un único parámetro cada vez.
No utilizar modelos de prueba
Las pruebas de calibración existen por una razón.
Intentar calibrar directamente sobre piezas complejas suele generar confusión.
Por ello recomendamos:
- Cubos XYZ.
- Temperature Towers.
- Retract Towers.
- Pruebas de flujo.
Utilizar filamento de baja calidad
No importa lo bien calibrada que esté la impresora.
Un material deficiente siempre generará problemas.
Por ello recomendamos utilizar filamentos de fabricantes reconocidos.
Ignorar la humedad
Muchos usuarios pasan por alto este aspecto.
Sin embargo, filamentos como:
- PETG.
- Nylon.
- TPU.
pueden absorber humedad rápidamente.
Esto afecta negativamente a la calidad de impresión.
Obsesionarse con la perfección absoluta
La impresión 3D no es una ciencia exacta.
Pequeñas variaciones son completamente normales.
Lo importante es alcanzar un nivel de calidad consistente y fiable.
Conclusión
Aprender cómo calibrar una impresora 3D es una de las mejores inversiones de tiempo que puede realizar cualquier usuario.
No importa si utilizas una impresora básica para aprender o una máquina profesional orientada a la producción.
La calidad final de las piezas dependerá en gran medida de una correcta calibración.
A lo largo de esta guía hemos visto cómo ajustar:
- La cama de impresión.
- El Z Offset.
- Los E-Steps.
- El flujo de material.
- La retracción.
- La temperatura.
- La velocidad.
Dominar estos parámetros te permitirá:
✅ Obtener impresiones más precisas.
✅ Reducir errores.
✅ Ahorrar material.
✅ Mejorar la calidad superficial.
✅ Conseguir resultados mucho más profesionales.
La buena noticia es que una vez comprendidos los fundamentos, la calibración se convierte en un proceso rápido y sencillo.
Y los resultados merecen completamente la pena.
Sigue aprendiendo sobre impresión 3D
También te recomendamos visitar nuestras guías relacionadas:
👉 Todo lo que necesitas saber sobre impresión 3D
👉 Materiales para impresión 3D
👉 Impresoras 3D para principiantes
👉 Mejores impresoras 3D profesionales
👉 Mejores páginas para descargar STL
Preguntas frecuentes sobre calibración de impresoras 3D
Dependerá del uso.
Como norma general conviene revisar la nivelación periódicamente y realizar una calibración completa cuando aparezcan problemas de calidad.
Sí.
Aunque muchas impresoras modernas vienen bastante ajustadas de fábrica, siempre es recomendable verificar los parámetros principales.
Es la distancia exacta entre la boquilla y la superficie de impresión cuando la impresora se encuentra en la posición Z=0.
Las causas más habituales suelen ser:
Mala nivelación.
Temperatura incorrecta.
Superficie sucia.
Z Offset mal ajustado.
Son los pasos por milímetro que realiza el motor del extrusor para empujar filamento.
Es el porcentaje de material que el slicer ordena extruir durante la impresión.
Normalmente por:
Retracción insuficiente.
Temperatura demasiado alta.
Filamento húmedo.
La primera capa.
Siempre.
Normalmente entre:
190°C y 220°C
dependiendo del fabricante.
Entre:
50 mm/s y 80 mm/s
suele ofrecer buenos resultados.
La combinación de:
Buena calibración.
Material de calidad.
Perfiles optimizados.
suele generar mejoras muy importantes.
Absolutamente sí.
Incluso modelos muy avanzados mejoran notablemente tras una calibración adecuada.
Una prueba diseñada para identificar la temperatura óptima de impresión de cada material.
Una prueba utilizada para optimizar la retracción y reducir el stringing.
La combinación entre:
Nivelación.
Z Offset.